How to Take a Professional Headshot: The Complete Guide
Learn how to take a professional headshot with your phone or camera. Step-by-step tips on lighting, posing, framing, and editing — plus the AI alternative.
You need a professional headshot. Maybe your LinkedIn photo is three years old, or you just landed a new role and the company website needs a portrait by Friday. Booking a photographer means $200–400, scheduling headaches, and half a day gone. The good news: you can learn how to take a professional headshot yourself, at home, with gear you already own.
Whether you set up a DIY shoot with your smartphone or use a free AI headshot generator, you can get studio-quality results without a photographer. This guide covers both routes, plus every professional headshot tip you need to get it right.
The Quick Option: AI Headshot Generators
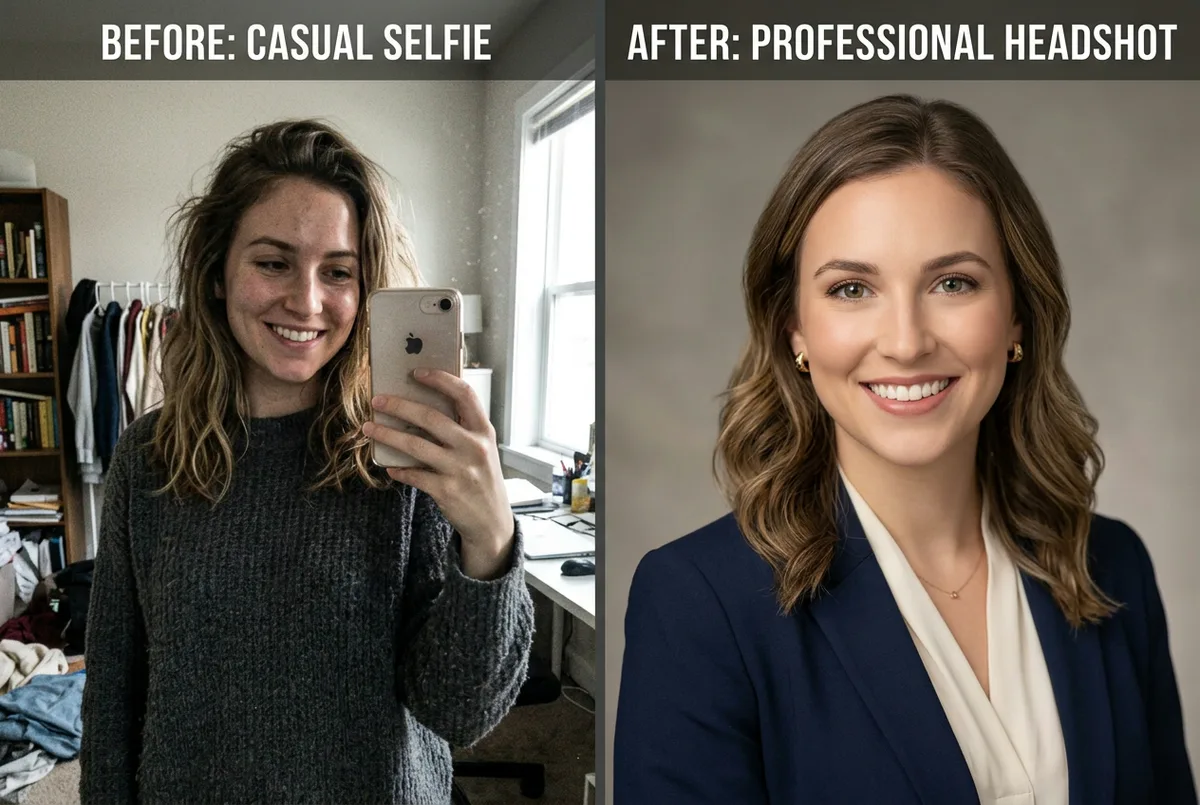
Before we get into the full DIY guide, here is the fastest way to get a professional headshot: skip the setup entirely.
AI headshot generators take a single photo and produce polished, studio-quality portraits in under a minute. You upload one photo of yourself, pick a style and background, and the AI does the rest. No tripod, no lighting setup, no editing.
This is a good fit if you need results today, want to try multiple styles without reshooting, or simply prefer not to deal with the DIY process. It costs nothing to try — ManyPics offers a free AI headshot generator that produces results comparable to a professional photo session.
If you want full control over your shoot and enjoy the process, keep reading. The tips below will help you take a professional headshot at home that looks polished and confident.
Equipment You Need (And What You Can Skip)
You do not need expensive gear. Here is what actually matters:
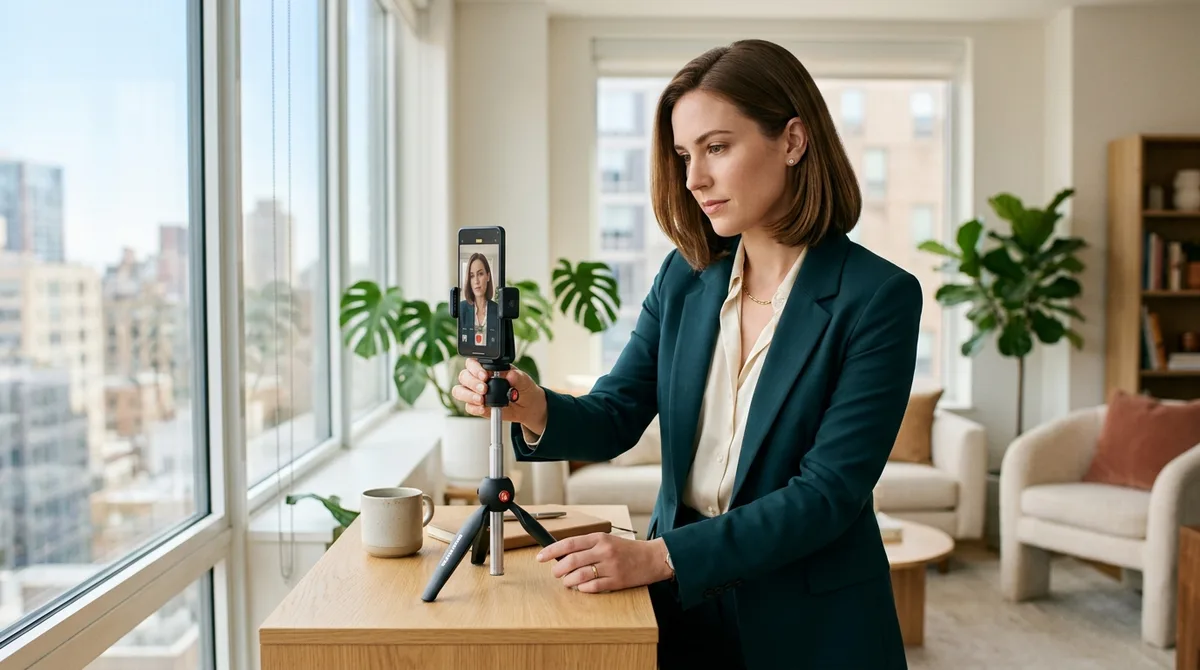
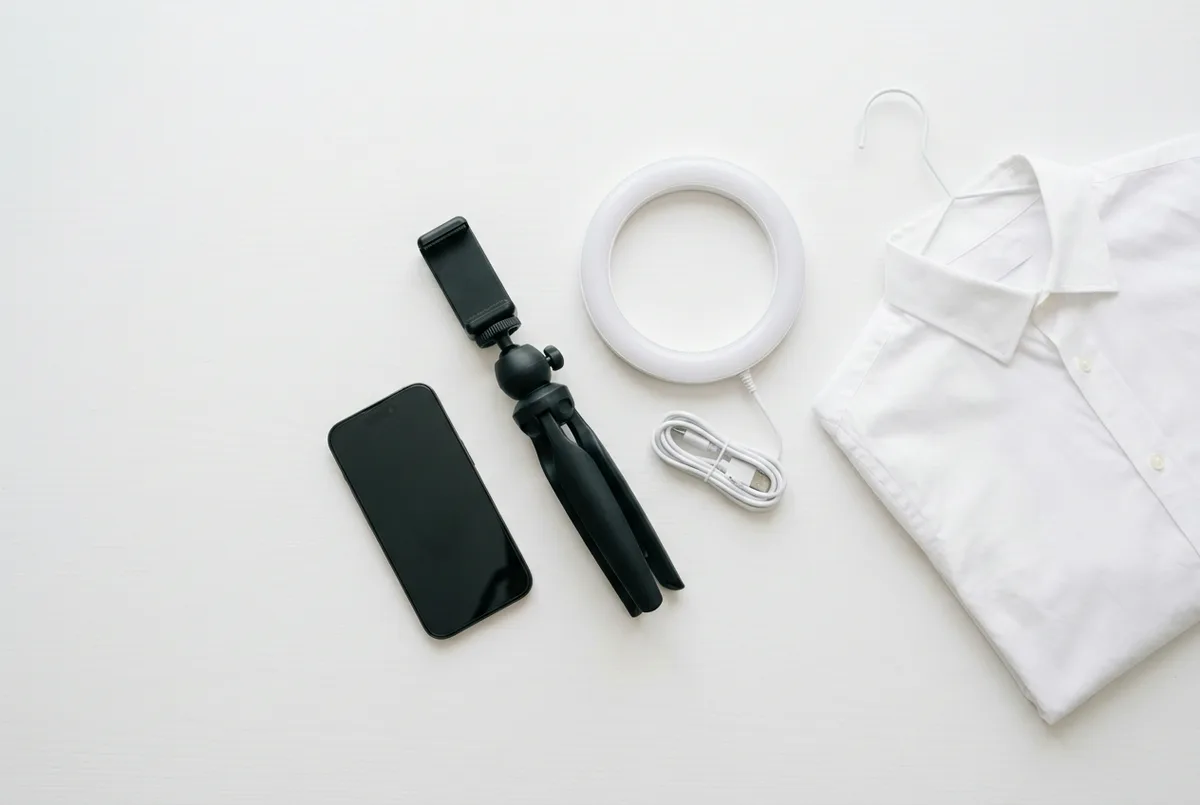
Camera. A modern smartphone (any iPhone or Android from the last 3–4 years) produces images sharp enough for LinkedIn, company websites, and most professional uses. If you have a DSLR or mirrorless camera, great — but it is not required.
The lens trick. Most phones have multiple lenses. Use the 2x telephoto lens, not the standard wide-angle. Wide-angle lenses distort your features: your nose looks bigger, your ears seem to disappear behind your head. The 2x lens (or "Portrait" zoom on some phones) produces proportions closer to what a professional photographer's 85mm lens captures. This single change makes the biggest difference when taking a headshot with your phone.
iPhone users: go to Settings → Camera → Formats → Most Compatible. This switches from HEIC to JPG, which is universally compatible and avoids compression artifacts when uploading to LinkedIn or company websites.
Lighting. A large window with indirect light is all you need. If you want more consistency, a ring light (10–18 inches, $20–40 online) gives soft, even illumination. Skip the overhead ceiling lights.
Background. A plain wall in white, gray, or cream works. A solid-colored bedsheet or large poster board taped to a door is a fine DIY alternative. For more ideas, see our guide to choosing a professional headshot background.
Tripod or stable surface. If nobody is available to hold the camera, a $15 phone tripod with a timer or Bluetooth remote lets you shoot solo. Prop your phone on a stack of books at eye level as a free alternative.
How to Light a Professional Headshot
If you want to know how to take a professional headshot that actually looks professional, lighting is the single biggest factor. Get this right, and everything else becomes easier.
Natural light (the easiest option)
Stand 2–3 feet from a large window and face toward it. The light should fall evenly across your face without harsh shadows. Overcast days are ideal because clouds act as a natural diffuser. If the sun is streaming directly through the window, hang a white sheet or sheer curtain to soften it.
Time of day matters. Early morning and late afternoon produce warmer, softer light. Avoid midday when overhead sun creates shadows under your eyes and nose.
If you are shooting at home with a north-facing window (in the Northern Hemisphere), you get the most consistent, diffused light throughout the day. This is the setup professional portrait photographers use when they want soft, even illumination without extra gear.
Outdoor light
Shade is your best friend outdoors. Find the shadow of a building where you have even light and no direct sun hitting your face. As Rob Felt, photography manager at Georgia Tech, puts it: "Direct sun would be the number one thing to avoid because you will get a lot of shadows."
Artificial light
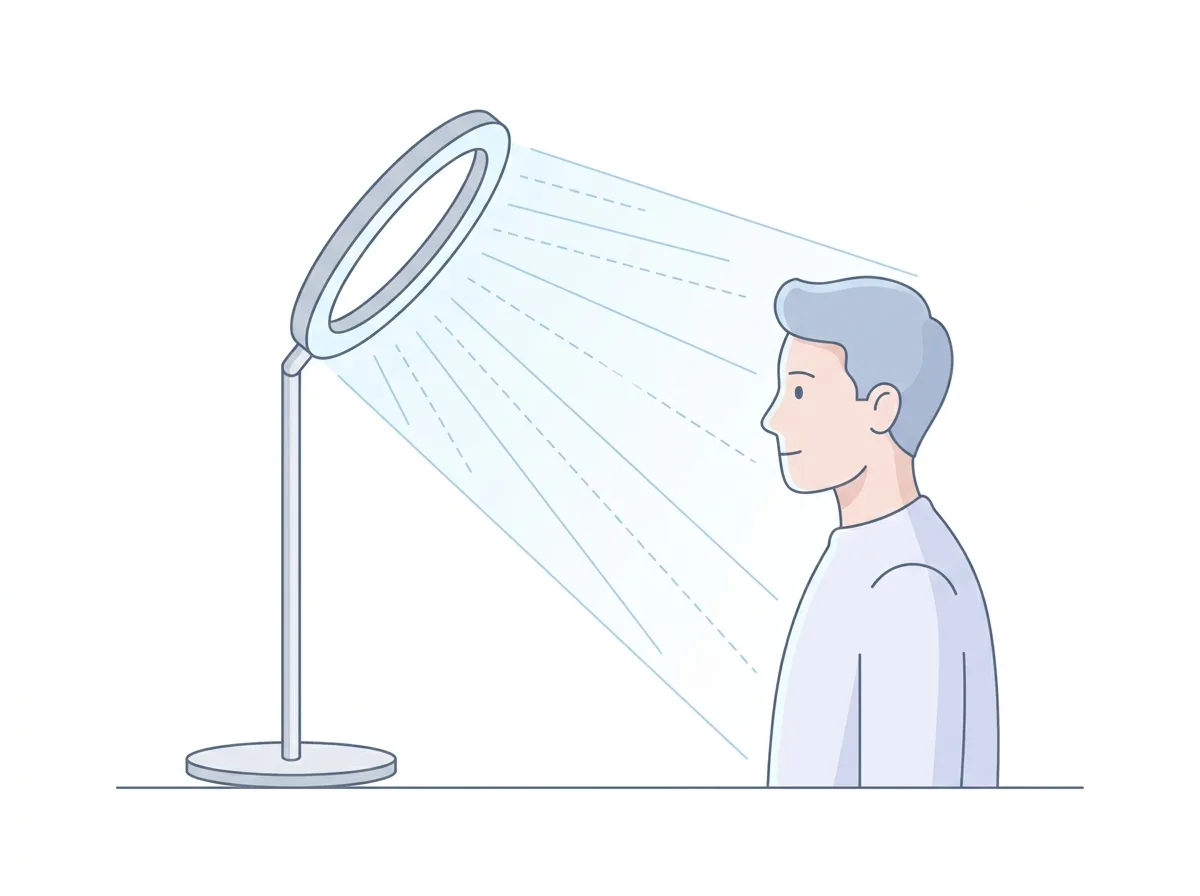
If natural light is not available, position a ring light at a 45-degree angle, slightly above and in front of you. This mimics the classic "loop" lighting pattern that professionals use. Never rely on overhead ceiling lights alone. They cast unflattering shadows under your eyes, nose, and chin, and often add a yellow or green color cast to your skin.
Common mistakes: mixing natural light with artificial light (the color temperatures clash), shooting too far from the window (your phone compensates with high ISO, which makes the image grainy), and using direct flash (harsh, flat, and unflattering).
What to Wear for a Professional Headshot
Your outfit affects how professional the result looks almost as much as your lighting.
Solid colors work best. Avoid busy patterns, large logos, and bold graphics. Solid navy, charcoal, white, or jewel tones photograph well across skin tones. Choose a color that contrasts with your background so you stand out in the frame.
Dress one level above your daily work attire. If you normally wear a polo, try a button-down. If you typically wear business casual, add a blazer. Your headshot is part of your personal brand, and this small upgrade makes a noticeable difference in the first impression it creates.
Grooming details. Style your hair the way you normally wear it. If you wear makeup, keep it natural and daytime-appropriate. A light dusting of translucent powder reduces shine on your forehead, nose, and cheeks, which is the hardest thing to fix in editing.
Glasses: tilt them slightly downward or position your light source to avoid glare on the lenses. Take a test shot to check.
Jewelry: keep it simple. Anything large or reflective pulls attention away from your face.
For a deeper guide on outfit selection by industry, see our article on what to wear for a professional headshot.

Posing and Expression Tips
Good posing turns a flat snapshot into a professional portrait. You do not need modeling experience. A few small adjustments make a real difference.
Body position
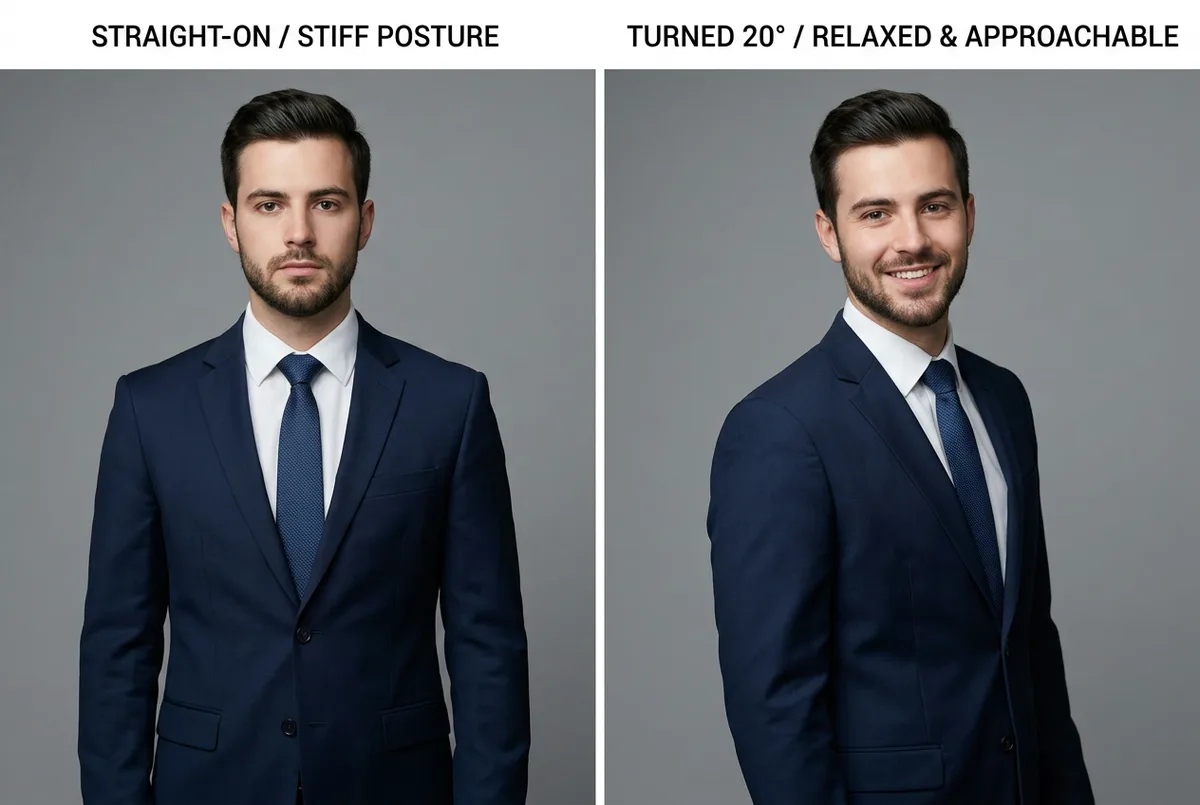
Turn your shoulders 15–30 degrees away from the camera instead of facing it straight on. This adds depth and makes you look more natural. Lean your weight slightly forward on your front foot. Standing flat-footed or leaning back tends to emphasize your chin and neck.
Push your chin slightly forward and down. It sounds odd, but this defines your jawline and elongates your neck. The difference is visible immediately.
Eye contact
Looking directly into the camera lens feels engaging and approachable. This is the right choice for most LinkedIn profile pictures and corporate headshots. Looking slightly off-camera creates a more editorial or creative feel.
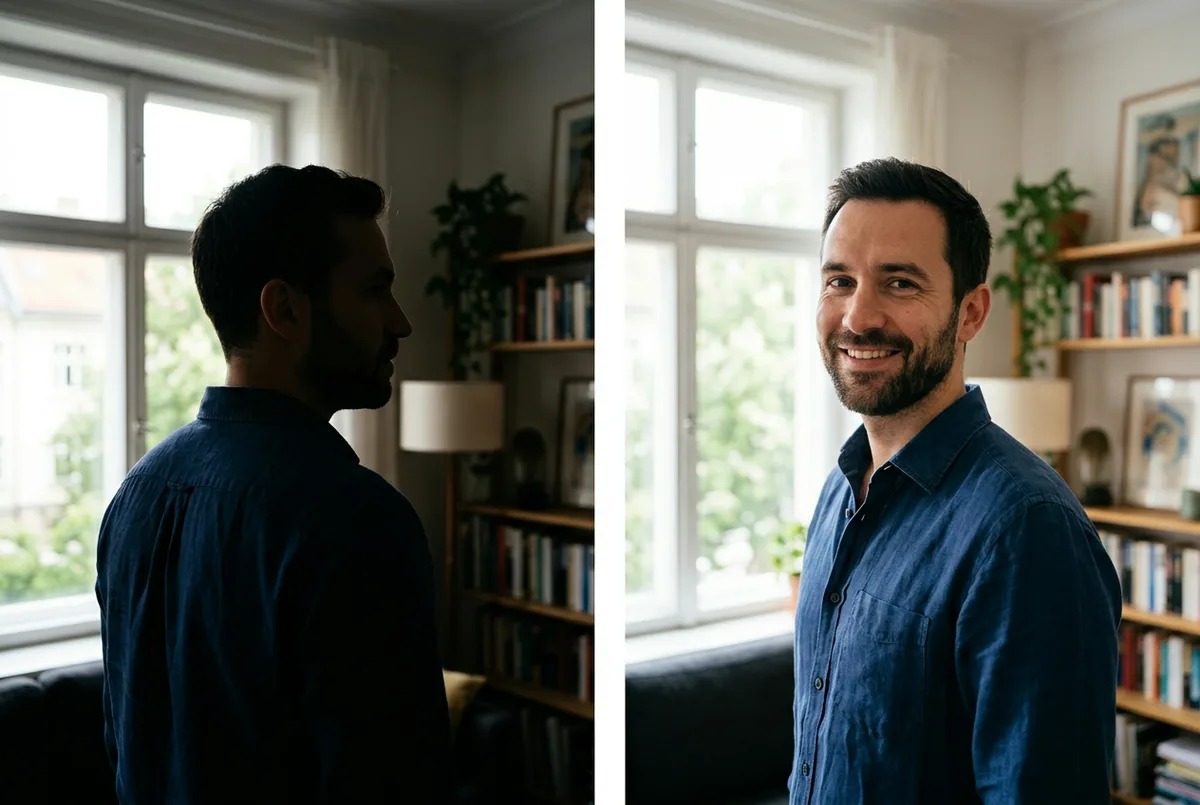
Getting a natural expression
A forced grin never looks good. Instead, think of a specific memory that makes you smile. Or try the laugh-then-freeze technique: make yourself laugh out loud, then hold the expression right as it fades into a natural smile. Take the photo at that moment.
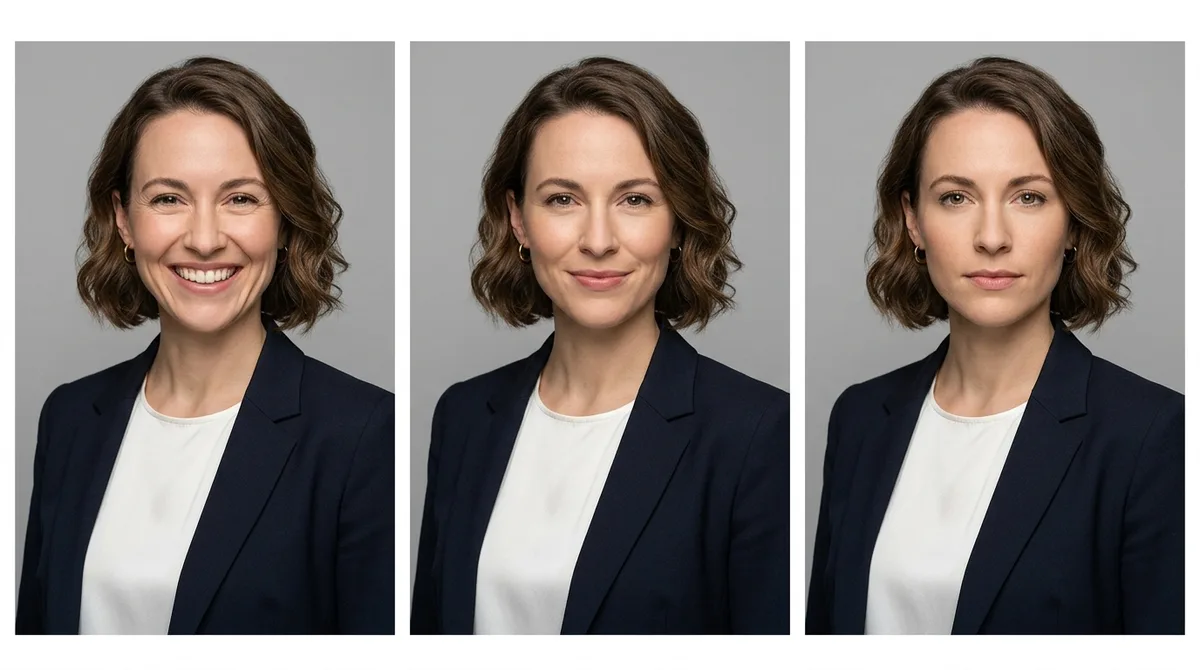
Try three types of expression across your shoot: a full smile with teeth, a subtle closed-lip smile, and a calm neutral. You may be surprised which one looks best.
How many photos to take
Take at least 20 shots. Professional photographers shoot hundreds of frames per session because expressions shift subtly between clicks. More options give you a much better chance of finding a headshot you actually like.
For more visual inspiration, check out our professional headshot poses guide.
Camera Settings and Framing
Phone settings
Use the back camera, not the selfie camera. The rear-facing lens is higher quality, has less distortion, and produces a sharper image. Set a 3- or 10-second timer, use a Bluetooth shutter remote, or have a friend press the button.
Portrait mode can work well. It blurs the background subtly and isolates your face, mimicking the shallow depth of field of a professional camera. But check the result: if the background blur looks artificial or clips your hair, switch to the standard photo mode instead.
Clean the lens. A quick wipe with a soft cloth before shooting makes a noticeable difference. Fingerprints and pocket dust create a hazy, soft look that no amount of editing fixes well.
DSLR settings
If you are using a DSLR or mirrorless camera, an aperture of f/2.8 to f/5.6 produces natural background blur while keeping your face sharp. Focus on the eyes. They are the focal point of every good headshot.
Composition
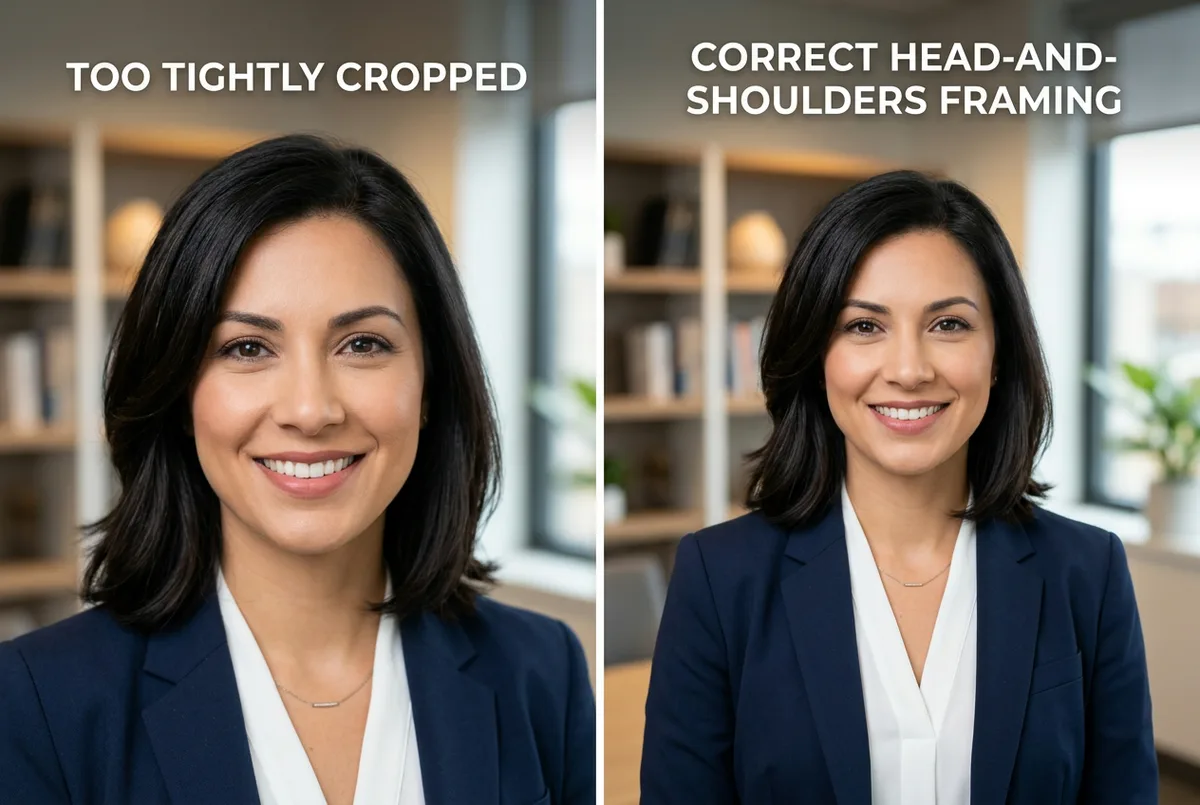
Frame your shot as a head-and-shoulders composition. Include both shoulders and leave a small amount of space above your head (often called "breathing room"). Do not cut off the top of your head, and do not crop too tightly.
Use the rule of thirds: imagine your frame divided into a 3×3 grid. Position your eyes along the upper third line. This creates a balanced, professional composition that draws attention to your face.
One professional headshot tip that is easy to forget: export at full resolution. You can always crop later, but you cannot add pixels back. For more examples of well-composed professional headshots, see our professional headshot examples.
Editing Without Overdoing It
Knowing how to take a good headshot means knowing when to stop editing. The goal is to look like you on a good day, not a different person.
What to adjust
- Exposure and brightness if the image is too dark or too bright
- Contrast to add a bit of depth
- Crop to frame your head and shoulders properly
- Minor blemish removal (a temporary spot is fine to clean up, but leave features that are part of your appearance)
Most phone editing apps (Photos, Google Photos, Snapseed, Lightroom Mobile) handle all of this for free.
What NOT to do
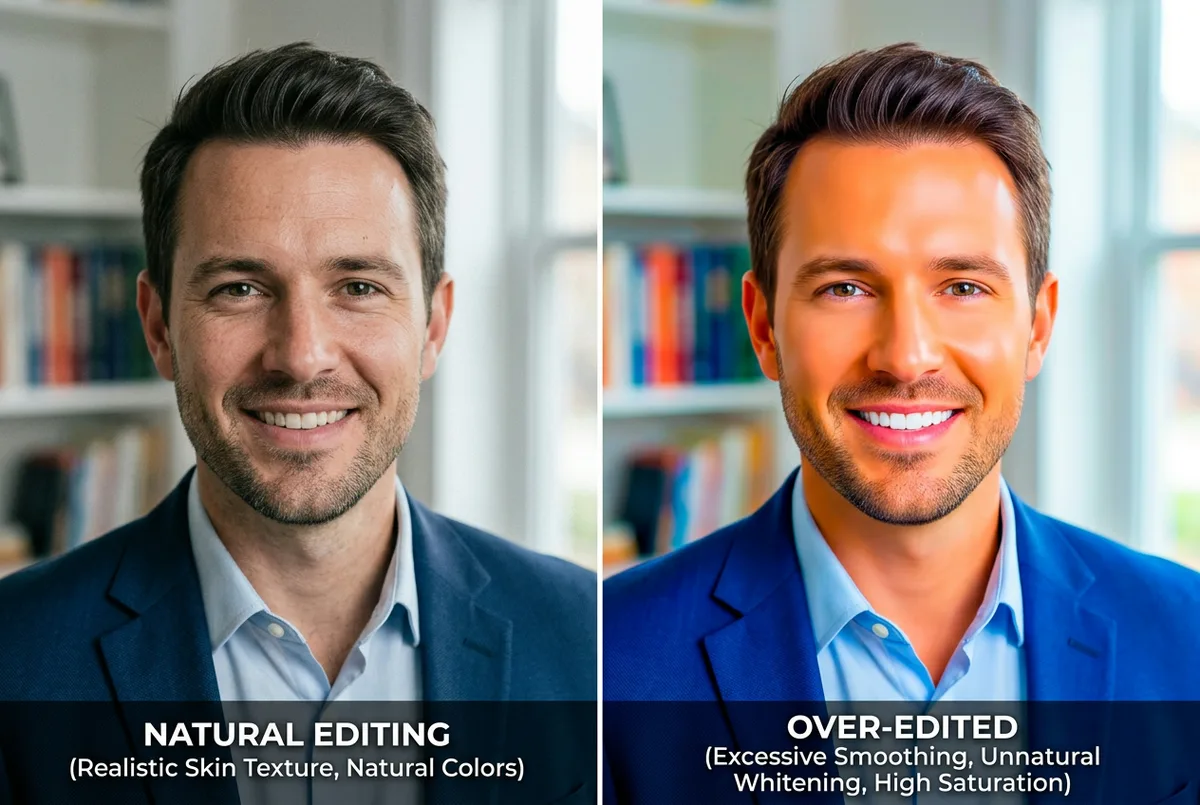
- Heavy skin smoothing. It makes your face look plastic and immediately signals "over-edited." People notice.
- Extreme teeth whitening. Slightly brighter is fine. Glowing white is not.
- Dramatic filters. Skip the Instagram presets. They look great on vacation photos, not on a business headshot.
- Background replacement with visible artifacts. If your background is distracting, a clean cutout tool can help, but only if the edges look natural.
Your 8-point checklist before using the photo
Before you set your new headshot as your LinkedIn profile picture, run through this list:
- Are your eyes sharp and in focus?
- Is your head reasonably straight (no extreme tilt)?
- Is the camera angle flattering (eye level or slightly above)?
- Is your face free of harsh shadows?
- Is the color natural (no yellow or green cast from indoor lights)?
- Are both shoulders visible in the frame?
- Was the lens clean when you shot this?
- Does your skin tone look natural (no over-smoothing, no over-saturation)?
If all eight pass, you have a good headshot ready to use.
DIY vs. Photographer vs. AI — Which Is Right for You?
Learning how to take a professional headshot is one option, but it is not the only one. There are three solid ways to get a good headshot. Each has trade-offs:
| DIY | Photographer | ManyPics | |
|---|---|---|---|
| Cost | $0 (gear you own) | $150–400 per session | Free to try, starting at $9 |
| Time | 1–2 hours | Half day (booking + session + delivery) | As fast as 30 seconds |
| Quality | Variable (depends on practice) | Premium for editorial and advertising | Professional for all digital use cases |
| Best for | Quick updates, tight budgets | Magazine shoots, ad campaigns, executive branding | LinkedIn, company site, CV, email signature, speaker bio |
| Requires | Setup, patience, photo skills | Scheduling and budget | One photo |
All three can give you a profile photo you are proud to use. The DIY route is free and gives you full creative control. A professional photoshoot delivers premium results for editorial or advertising needs. And for every standard professional use case — LinkedIn, your company website, a CV, an email signature — an AI headshot generator like ManyPics' free tool delivers professional quality in under 1 minute, starting at $9. For a detailed breakdown of costs, quality, and when each option makes sense, read our professional headshot photographer comparison.
Frequently Asked Questions
How much does a professional headshot cost?
A session with a professional photographer typically costs $150–400 in the US, depending on your city and the photographer's experience. Corporate packages for teams can run higher. DIY headshots cost nothing beyond equipment you likely own, and AI headshot generators like ManyPics offer a free tier and plans starting at $9.
Can I take a professional headshot with my phone?
Yes. Modern smartphones produce images more than good enough for LinkedIn, company websites, and professional bios. The key is using the right lens (2x telephoto, not wide-angle), good lighting (window light or a ring light), and a clean, simple background. Many of the headshots you see on professional profiles today were shot with a phone.
What is the best background for a headshot?
A plain wall in a neutral color (white, gray, light blue, or cream) is the safest choice. It keeps the focus on your face. Solid-colored sheets or poster boards work as affordable alternatives. Avoid busy or cluttered backgrounds. For more options, browse our professional headshot backgrounds gallery.
How should I smile in a headshot?
The most effective approach is a genuine, relaxed expression. A full smile with teeth reads as warm and approachable. A subtle, closed-lip smile feels calm and confident. Both work well for professional contexts. Avoid holding a smile too long because it starts to look forced. Instead, think of something that genuinely makes you happy, or laugh and then let the smile settle naturally.
Do I need a photographer for a LinkedIn headshot?
No. A well-lit DIY headshot or an AI-generated headshot works perfectly for most LinkedIn profiles. What matters most is good lighting, a clean background, and a natural expression. According to LinkedIn, profiles with a professional-looking photo receive up to 14x more views and 36x more messages than those without one.
What is the best lighting for headshots at home?
Soft, indirect natural light from a large window is the most reliable option for a home headshot setup. Stand 2–3 feet from the window and face toward it. Avoid direct sunlight (which creates harsh shadows) and overhead ceiling lights (which cast unflattering shadows under your eyes and add color casts). A ring light positioned at 45 degrees above you is a good artificial alternative.
Can AI generate professional headshots?
Yes. Modern AI headshot generators produce professional-quality results for LinkedIn, company websites, email signatures, and conference speaker pages. You upload a single photo, choose a style and background, and receive polished portraits in under 1 minute. Try our free AI headshot generator to see the quality for yourself.

Wrapping Up
Now you know how to take a professional headshot at home with a smartphone, a window, and about an hour of your time. Focus on lighting first, keep your background clean, pose naturally, and resist the urge to over-edit. If you would rather skip the setup entirely, a free AI headshot generator can produce polished results from a single photo in under 1 minute. Either way, a strong professional headshot is within reach.


Get your AI headshot